
One of the most important factors to consider when purchasing a new shed is the base on which it is going to stand. Without a decent base at its foundation your shed, summerhouse or garage is at serious risk of developing major structural faults, pretty much as soon as it has been built.
Without a sturdy level base underneath your building will start to lose its shape and develop large cracks and gaps which, besides being unsightly, jeopardize its weatherproofing and in a worst case scenario can lead to the building collapsing.
This is due to the nature of the construction which means that as soon as the building has been completed it gradually snuggles itself in to its new surroundings and settles  down. Without a level base it will settle at an odd angle which is where the gaps will start to appear and doors will stop opening properly etc. This also applies to the strength of the base too, even the smallest 6×4 wooden shed has a considerable weight to it and it is essential to use materials in the base that can take the weight of the job, if the base is not strong enough you will again see gaps and jammed windows galore!
We always recommend either a concrete base or paving slabs. By using one of these you can be confident that your building will remain in shape, be weatherproof and give you many years of trouble free service!
Here is a quick guide on how to lay these two different bases to give you an idea of the job involved and whether you can do it yourself (with someone to help of course) or use an outside party such as a landscape gardener.
For a concrete base you need the following;
- Building Sand
- Cement
- Hardcore
- Timber
- Tape Measure
- Pegs & String
- Hardcore
Once you’ve picked your location, measure out an area that is 5cm larger than your building on all sides. Remove any vegetation from this area and dig down 6 inches (or less if you want the base to be raised above ground level).
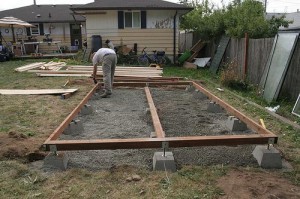
For the cement to take shape you will need to measure and cut a timber framework to line the edges. Ensure that this is sitting perfectly flat on the ground and flatten out the entire surface using a spade and rake. Next put down a 3 inch layer of hardcore, covering generously with sand.
For the concrete you can either mix 1 part cement to 5 parts ballast, or use a pre made dry concrete mix.
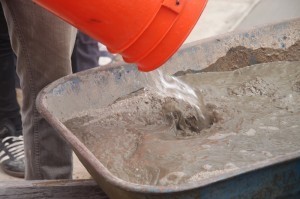
- Slowly add water to the mixture, ensuring that it does not become too sloppy.
- Spread the concrete evenly into the framework, filling to slightly above the timber.
- Use another long piece of timber to level off the cement, rest the wood against the framework and move across it in a slow sawing motion to level out all of the concrete.
- If wet weather is likely cover the base with plastic or tarpaulin for 24 hours.
- In particularly hot or dry conditions covering with damp sacks and topping up with water occasionally can prevent your base from cracking as it dries.
If you decide to build your shed base using paving slabs instead you’ll need:
- Flat Face Paving Slabs
- Building sand
- Standard cement
- Rake
- Standard cement
- Tape measure
- Spade
- Standard cement
- Pegs and string
- Rubber mallet
Choose your location carefully and measure out the area for your base as outlined above in the concrete base guide. Dig down to the required depth (about 2.5cm, but differing depending on the thickness of your paving slabs and whether you want a level or raised base).
Next combine one part cement with eight parts building sand to make a dry mixture. this needs to be spread evenly across the base area (about 4cm deep) and levelled out with a rake. Working out from a corner lay each slab and tap into position using your mallet, whilst regularly checking the flatness with a spirit level to ensure all slabs are in line with each other.

Do one last check with a long straight edge, making any adjustments to ensure a perfectly level surface, and brush away any excess sand or cement.
Starting out with a solid, level base will make things much easier when it comes to building your shed, and will protect the building from damp or muddy conditions. Even for relatively simple projects like this it’s vital that you choose the best selection of tools and materials. Our expert advice and comprehensive range of products will save time and ensure that your project runs smoothly.
By using the above as a guide you should be able to successfully create your base and be confident that it is adequate for your buildings needs. However, if DIY is not really your strong point we strongly recommend getting someone in to do the job for you – by doing this you are not only guaranteeing a professional finish but you are also supporting local businesses!
Base instructions were sourced from another website


