Winter Maintenance Tips for Your Garden Shed: Keeping Your Outdoor Oasis Safe and Sound

As we work our way through the Winter, it’s essential to ensure that your garden shed is adequately prepared to withstand the cold, harsh weather conditions. Proper winter maintenance not only protects your shed from damage but also preserves its contents and extends its longevity. In this article, we’ll explore some valuable tips to help you winterize your garden shed and keep it in top condition throughout the season.

  1. Clear Surrounding Debris:
    Ideally before winter sets in, take the time to clear any debris, leaves, or branches from around your shed. Accumulated debris can block ventilation, trap moisture, and provide hiding spots for pests, increasing the risk of damage to your shed and its contents.
  2. Check for Leaks and Seal Gaps:
    Inspect your shed for any signs of leaks or gaps where cold air and moisture could seep in. Seal any cracks or openings with weather stripping, caulk, or foam insulation to prevent drafts and moisture infiltration, which can lead to mould, mildew, and potentially wood rot.
  3. Reinforce Doors and Windows:
    Ensure your shed doors and windows are properly sealed and reinforced to withstand winter weather. Replace worn weather stripping and consider adding storm windows or shutters for added protection against wind, snow, and rain.
  4. Protect Against Moisture:
    Moisture is one of the biggest threats to a garden shed during winter. Use a waterproof sealant to treat wooden surfaces and prevent water penetration. Consider installing a dehumidifier or moisture-absorbing products inside the shed to maintain optimal humidity levels and prevent mould/mildew growth.
  5. Insulate Pipes and Plumbing Fixtures:
    If your shed is equipped with plumbing fixtures or water supply lines, be sure to insulate them to prevent freezing and potential burst pipes. Use pipe insulation sleeves or heat tape to protect exposed pipes and fittings from the cold.
  6. Elevate Stored Items:
    Raise stored items off the ground using shelves or pallets to prevent them from coming into contact with moisture or cold surfaces. This helps protect items from water damage and minimizes the risk of mould, rust, or decay.
  7. Regularly Remove Snow and Ice:
    After snowfall, promptly remove snow and ice build up from the roof and around the shed to prevent structural damage and reduce the risk of collapse. Use a snow rake or shovel with a non-abrasive edge to clear snow without damaging the shed’s roof or siding.
  8. Perform Regular Inspections:
    Make it a habit to inspect your garden shed regularly throughout the winter season. Look for signs of damage, such as cracks, leaks, or pest activity, and address any issues promptly to prevent further deterioration.

By following these winter maintenance tips, you can ensure that your garden shed remains in excellent condition and continues to serve as a reliable storage space for years to come. With proper care and attention, your outdoor oasis will withstand the winter months and emerge unscathed, ready to welcome the arrival of spring.

Swallow (GB) Greenhouses Ltd

I love receiving new marketing information from our various suppliers and one that was dropped onto my desk last week was a great partner we have called Swallow (GB) Ltd we have been working with this company since our first introduction many moons ago.

Raven Greenhouse from Swallow

Swallow Raven Greenhouse

Swallow Greenhouse products are made from Thermowood which is manufactured from red wood pine. The process involves kiln drying the timber which is put into a special oven where a powerful compressor which removes the air, the temperature is raised to 215 degrees C which bakes the timber, the result seals the capillaries, destroys resins and proteins and stabilises the timber.

The benefits are;

  • It can be left untreated
  • All bacteria is killed, resulting in a sterile material
  • Paints excellently and lasts up to three times longer
  • The timber is totally natural and chemical free
  • Reduced thermal conductivity
  • Consistent colour throughout the wood
  • Improves durability against decay
  • Improved dimensional stability
  • Good choice for allergy sufferers

    Falcon Greenhouse

    Swallow Falcon Greenhouse

Some general advice from Swallow Greenhouses on how to keep your greenhouse in tip-top shape.

A greenhouse is an excellent addition to any garden, whether a novice or a time honoured gardener, it is always good to receive a few tips. Your new Swallow Greenhouse will give you the ability to extend the growing season, with the possibility to grow produce that would not usually grow in your area of the country.

All Swallow Greenhouses are fitted with automatic vents allowing ventilation and temperature control. These help to make the greenhouse efficient and with the inclusion of a regular cleaning routine will keep your greenhouse pest and disease free.

Mould

By far the biggest problem you might come across in your greenhouse is mould. However, with a few simple steps your greenhouse should be mould free all year round.

Grey mould is caused by the fungus Botrytis Cinerea, a common fungus with a wide host range. It produces are large amount of spores that move around the greenhouse via air currents. To help control the grey mould a control of the environment should be maintained, this will prevent the fungus growth and to sporulate. By keeping the humidity level below 85%, as well as ensuring good air circulation and adequate plant spacing.

Cygnet Greenhouse

Swallow Cygnet Greenhouse

Annual Greenhouse Cleaning

In the first instance its a good idea to find way suits you best. With the seasons in mind, a warm sunny day will put less stress on the plants when you move them outside. This will enable you to use cleaning solutions without the worry of damaging or spills on any of your plants. Working from the top to bottom, clean the windows thoroughly with soapy water, adding one part bleach for ten parts of water if you can see mould or moss growth.

Sweep off any growing tables or staging to clear out any dirt or weed remnants. Discard broken or unsuitable growing containers. Clean and sterilize any benches and tools. Sweep and disinfecting the floor, another step pertinent to maintaining a disease and pest free greenhouse.

This is also a good opportunity to clean the outside of the greenhouse, clearing gutters, opening vents to clean thoroughly, cleaning windows.

Daily Greenhouse Upkeep

Finch Greenhouse

Swallow Finch Greenhouse

To maintain a healthy and well balanced area for your plants to grow, a routine daily maintenance schedule is a good idea. Just simply sweeping, weeding, removal and disposal of infected and damaged plants. Areas kept clean and tidy as you become more familiar with your greenhouse you will be able to notice where any maintenance is required.

All these measures will add up to a healthy growing environment for your plants, with an abundance of growth.

Click here to view our full range of Greenhouses

Winter Tips

With winter well underway there are few things you need to take care of to make sure you stay on top of the gardening.

Keeping on top of the weeding and having a general tidy up of the borders is obvious, and if you haven’t already, start a compost. Start by going out and buying a bin or making a partially enclosed area for a heap. You must make sure to replace the goodness in soil after the growing season, not to mention autumn offers masses of garden waste. Cuttings from the lawn, bedding plants, moss, hedge clippings and kitchen peelings are ideal!

Make sure to turn the heap over once a week, but never add any diseased or pest ridden material to your compost, they are for the bonfire.

The greenhouse is due a good clean, make sure to do it thoroughly to prevent pests hibernating. Wash both the inside and outside windows to allow maximum light to get through. You basically want to hose down the entire greenhouse, especially the dark corners. If you feel up to it, take all your plants out the greenhouse, light a sulphur candle in the middle of the floor and shut the door. Leave it until the smoke and fumes have completely gone, (a good 8 hours later) and your greenhouse should be pest free!
Take care of your soil by digging in good compost, and as much organic matter as possible.

Now is also the perfect time to plant container grown shrubs, trees or bushes, as the moist warm soil is perfect for growing.

Although watering isn’t too much of an issue this time of year, make sure to keep an eye on it, there is still the occasional dry period.

By keeping on top of the choirs and making sure you are ready for the winter will make your life a whole lot easier in the long run. The key is planning, make sure you know what needs to be done and when to do it and you will be good to go.

It All Starts With The Base

One of the most important factors to consider when purchasing a new shed is the base on which it is going to stand. Without a decent base at its foundation your shed, summerhouse or garage is at serious risk of developing major structural faults, pretty much as soon as it has been built.

Without a sturdy level base underneath your building will start to lose its shape and develop large cracks and gaps which, besides being unsightly,  jeopardize its weatherproofing and in a worst case scenario can lead to the building collapsing.

This is due to the nature of  the construction which means that as soon as the building has been completed it gradually snuggles itself in to its new surroundings and settles wonky
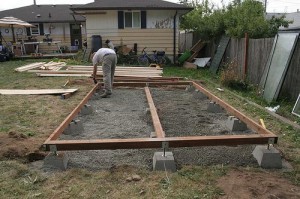
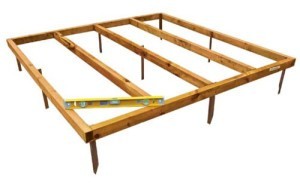
down. Without a level base it will settle at an odd angle which is where the gaps will start to appear and doors will stop opening properly etc. This also applies to the strength of the base too, even the smallest 6×4 wooden shed has a considerable weight to it and it is essential to use materials in the base that can take the weight of the job, if the base is not strong enough you will again see gaps and jammed windows galore!

We always recommend either a concrete base or paving slabs.  By using one of these you can be confident that your building will remain in shape, be weatherproof and give you many years of trouble free service!

Here is a quick guide on how to lay these two different bases to give you an idea of the job involved and whether you can do it yourself (with someone to help of course) or use an outside party such as a landscape gardener.

For a concrete base you need the following;

  • Building Sand
  • Cement
  • Hardcore
  • Timber
  • Tape Measure
  • Pegs & String
  • Hardcore

Once you’ve picked your location, measure out an area that is 5cm larger than your building on all sides. Remove any vegetation from this area and dig down 6 inches (or less if you want the base to be raised above ground level).


building-shed-base

For the cement to take shape  you will need to measure and cut a timber framework to line the edges. Ensure that this is sitting perfectly flat on the ground and flatten out the entire surface using a spade and rake. Next put down a 3 inch layer of hardcore,  covering generously with sand.


For the concrete you can either mix 1 part cement to 5 parts ballast, or use a pre made dry concrete mix.

img_0406

  • Slowly add water to the mixture, ensuring that it does not become too sloppy.
  • Spread the concrete evenly into the framework, filling to slightly above the timber.
  • Use another long piece of timber to level off the cement, rest the wood against the framework and move across it in a slow sawing motion to level out all of the concrete.
  • If wet weather is likely cover the base with plastic or tarpaulin for 24 hours.
  • In particularly hot or dry conditions covering with damp sacks and topping up with water occasionally can prevent your base from cracking as it dries.

If you decide to build your shed base using paving slabs instead you’ll need:

  • Flat Face Paving Slabs
  • Building sand
  • Standard cement
  • Rake
  • Standard cement
  • Tape measure
  • Spade
  • Standard cement
  • Pegs and string
  • Rubber mallet

Choose your location carefully and measure out the area for your base as outlined above in the concrete base guide. Dig down to the required depth (about  2.5cm, but differing depending on the thickness of your paving slabs and whether you want a level or raised base).

Next combine one part cement with eight parts building sand to make a dry mixture. this needs to be spread evenly across the base area (about 4cm deep)  and levelled out with a rake. Working out from a corner lay each slab and tap into position using your  mallet, whilst regularly checking the flatness with a spirit level to ensure all slabs are in line with each other.

Installation of paving slabs

Do one last check with a long straight edge, making any adjustments to ensure a perfectly level surface, and brush away any excess sand or cement.

Starting out with a solid, level base will make things much easier when it comes to building your shed, and will protect the building from damp or muddy conditions. Even for relatively simple projects like this it’s vital that you choose the best selection of tools and materials. Our expert advice and comprehensive range of products will save time and ensure that your project runs smoothly.

By using the above as a guide you should be able to successfully create your base and be confident that it is adequate for your buildings needs. However, if DIY is not really your strong point we strongly recommend getting someone in to do the job for you – by doing this you are not only guaranteeing a professional finish but you are also supporting local businesses!

Base instructions were sourced from another website

Condensation In Metal Sheds – advice from one of our top manufacturers

image

Metal Garden Sheds are an incredibly popular alternative to traditional timber sheds and outdoor buildings, they are more weather resistant, secure, fire retardant and virtually maintenance free. Although metal sheds suffer from very few of the labour intensive problems associated with other types of shed, they can sometimes be affected by the condition of their surroundings. In a word ‘condensation’!

A high quality metal shed will incorporate design features like ventilation, which should avoid the issue of condensation, however occasionally dampness can be caused by external sources. If there is any moisture in the foundations, the warmer air inside the shed will rise and settle on the cold metal panels. The damp will then condense and drip down, creating a cycle, and once this process is established it is not terribly easy to halt, making prevention rather than cure, a better idea. If you have yet to create the foundation for your metal shed, there are few rules to ensure that condensation never raises its ugly head.

Make your base whether concrete or slab, a few inches larger than the base rail of the shed,

then:-

  • Place a damp-proof membrane into the foundations at least two inches higher than ground level.
  • Ensure that the newly laid foundations of your shed are allowed to cure for around 3-7 days, or longer if conditions are damp. This will avoid creating possible water related problems caused by insufficiently dried concrete.
  • When ready, bolt down your shed to the base and apply a silicone or mastic sealant to the inside shed base rails. By applying this to the inside you will facilitate trouble free drainage, while preventing water seepage into the shed.

If you have already constructed your metal shed and base and are currently faced with the problem of condensation, there are still ways of tackling this.

  • Remove your shed from its base and place a timber floor which is a few inches larger than the shed base measurements on raised bearers.
  • Secure the shed to the wooden floor using wood screws, and mastic seal the inside base rails of the shed.
  • Ensure regularly that water cannot stop ventilation by collecting underneath the floor.

Alternatively:-

  • Wait for a nice warm day, and begin by wiping down the underside of the roof panels with methylated spirits.
  • When dry attach polystyrene tiles to the underside with spray glue which is designed to bond polystyrene to metal and is impervious to heat and cold.
  • This insulation cannot eradicate moisture within your shed, however condensation should no longer be an issue.

This blog was originally published on one of our manufacturers pages, with years of experience behind them we are more than confident in sharing their tips and advice.

New Colour Options Available!

Some of our most successful lines will soon be available in additional colours!

Our immensely popular Olympian Metal Garages have always been top sellers at Taylors Garden Buildings.  Available in 4 sizes (12 x 20 – 12 x 38) they have always been available in a very attractive emerald green colour, which not only looks pleasing on the eye but also blends in with a vast majority of gardens up and down the UK.

Now, after several years of good sales and positive feedback from our customers, we are happy to announce that these durable structures are going to be available in an anthracite grey colour too!

image

 These will be going on sale September 29th, watch this space!

Have a wonderful weekend!

How to Video’s on YouTube

How to Video’s on YouTube

We have recently just uploaded a range of “How to’s” video to YouTube, so that our customers can have that little helping hand when constructing their purchased products.

youtube-logo-hi-res2

To see our channel feel free to click the link below: https://www.youtube.com/user/TaylorsGardens

Our Video’s:

d_29275


Instructional videos.

A recent addition to many of our listings are instructional videos!

We are all too aware that sometimes the traditional paper variety are just not quite enough – no matter how comprehensive! The same goes of course for the PDF versions that are on a vast majority of our listings, there are times when we just want to actually see somebody doing it. This gives us just that bit of extra confidence when erecting our brand new summerhouse, gazebo , metal shed etc etc.

Take a look at this example, we are sure you will agree that it is very indepth!

https://www.youtube.com/watch?v=DPgh8hOeips&ab_channel=TaylorsGardenBuildings

July update

Summer is in full swing and business is booming at Taylors Garden Buildings!

Our Metal shed range is selling nicely and we have seen a steady increase in sales of our summerhouses and gazebo lines. Barbeques are also selling well, so many of you are obviously sitting outdoors of an evening enjoying a nice burger and a few drinks (we still haven’t received our invites though – we blame the postal service).

Our sales team are as eager as ever to speak with you if you have any enquiries, don’t forget that we are on call 7 days a week!

Also, have you visited our show site recently? Woodmeadow are constantly expanding their range and services (the tea room is open and in full swing don’t forget!) and there has been a big change around in the shop recently which has dramatically improved the ergonomics of the store and improved the customer shopping experience no end.

We look forward to seeing/speaking to you!

Garden Furniture

How beautiful has the weather been this past week or two?

For the first time so far this year we are using our beloved gardens for what they are meant to be for – to sit outside in nice weather, enjoying our plants, soaking up a few rays and having a nice glass of wine or two.

A rather embarrassing thing happened to me last week, after spending some time outdoors tending plants and tidying up the lawn I decided to take a well earned break and have a sit in the sun. With a glass in hand and my mobile in the other I plopped myself in to one of our faithful garden chairs only to have the thing collapse underneath me!! (This is actually true by the way and not fabricated to give you all a laugh at my expense – it was witnessed by my partner who found it very amusing to say the least!).

Looking back on it I probably did look funny squatted there on the floor surrounded by splinters of wood with a glass of wine in my hand (which oddly enough hadn’t spilled a drop).

The chair in question was an old fold away chair made of wood which we have had for many years, we had left them out over the winter so obviously the cold and damp had caused it to perish. (Note to self – store our furniture during cold spells!).

Luckily, being an employee of Taylors Garden Buildings, I have a large database of quality garden furniture to peruse and I am in the midst of doing so. Might go for one of our brushed steel sets this time!

So, with the beautiful weather in full swing I am sure that many of you will be looking for some new furniture for your gardens/patios and hopefully your reasons for doing so will be considerably more dignified than mine!!

Garden furniture

Not actually my chair in question but it gives you an idea!

Come and view our extensive garden furniture range now!!